
| Type | Boss |
|---|---|
| Environment | Brimstone Crag |
| AI Type | Brimstone Elemental AI |
| Max Life | 41,000 / 65,600 / 78,720 (pre-Providence) 205,000 / 328,000 / 393,600 (post-Providence) |
| DR | 15% |
| KB Resist | 100% |
| Inflicts debuff | 100% chance |
| Debuff duration | 2 seconds(Dart, Hellblast) 3 seconds (Contact, Hellfireball) 5 seconds (Brimstone Ray) |
| Debuff tooltip | Rapid health loss |
| Immune to | |
| Vulnerable to: | |
| Resistant to: |
| Coins | 10 1 |
|---|
- Item (Quantity)Rate
 Essence of Chaos (4-8 / 5-9)100%
- Bloodstone(Once Providence is defeated) (20-30 / 25-35)100%
- One of the following three items will always be dropped:
- 25% / 33.33%
- 25% / 33.33%
- 25% / 33.33%
- 100%
- Brimrose(After defeating Providence)100%
- 50% / 100%
- 20%
- 10%
- 10%
- Greater Healing Potion (5-15)100%
- 14.29%
- 10%
- Brimstone Crag (Lore)(Always on first kill)100%
- Brimstone Elemental (Lore)(Always on first kill)100%
- Treasure Bag(Brimstone Elemental)
- • Charred Relic(In Revengeance Mode only)
100% - •

![]() "The greatest trick I've ever told... was convincing the world I didn't exist..."
"The greatest trick I've ever told... was convincing the world I didn't exist..." ![]()
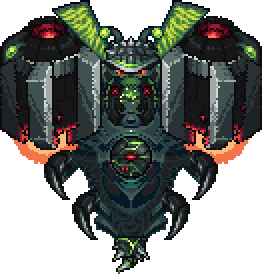
The Brimstone Elemental (Japanese: 硫黄のエレメンタル Iō no erementaru) is a Hardmode boss fought in the Brimstone Crag biome. She cycles through three distinct behaviors, with varying levels of aggression and methods of attack.
After Providence, the Profaned Goddess has been defeated, she becomes much stronger and begins dropping Bloodstone, which can be combined with Phantoplasm and Blood Orbs to make Bloodstone Cores.
Spawn[]
The Brimstone Elemental does not spawn on her own and requires the player to summon her with the Charred Idol. She must be summoned in the Brimstone Crag. ![]() If the Tranquility Mod is enabled, if the Nightmare Mode is enabled in the current world, she can be encountered at the Shattered Court at the edge of the Brimstone Crag as soon as player kills the Wall of Flesh.
If the Tranquility Mod is enabled, if the Nightmare Mode is enabled in the current world, she can be encountered at the Shattered Court at the edge of the Brimstone Crag as soon as player kills the Wall of Flesh.
Phases[]
| Type | Boss |
|---|---|
| AI Type | Brimstone Elemental AI |
| Damage | Contact: 60 / 96 / 120 / 136 (pre-Providence) 180 / 288 / 360 / 414 (post-Providence) Brimstone Ray: 184 / 200 |
| Defense | 15 (pre-Providence) 30 (pre-Providence Ray Phase) 60 (post-Providence) 180 (post-Providence Ray Phase) |
| DR | 15% |
| KB Resist | 100% |

| Type | Boss |
|---|---|
| AI Type | Brimstone Elemental AI |
| Damage | Contact: 60 / 96 / 120 / 136 (pre-Providence) 180 / 288 / 360 / 414 (post-Providence) Brimstone Dart: 60 / 100 / 108 / 116 (pre-Providence) 120 / 220 / 275 / 316 (post-Providence) Brimstone Hellfireball: 70 / 112 / 128 / 140 (pre-Providence) 130 / 232 / 290 / 333 (post-Providence) |
| Defense | 15 (pre-Providence) 60 (post-Providence) |
| DR | 15% |
| KB Resist | 100% |

| Type | Boss |
|---|---|
| AI Type | Brimstone Elemental AI |
| Damage | Contact: 60 / 96 / 120 / 136 (pre-Providence) 180 / 288 / 360 / 414 (post-Providence) Brimstone Dart: 60 / 100 / 108 / 116 (pre-Providence) 120 / 220 / 275 / 316 (post-Providence) Brimstone Hellblast: 60 / 100 / 108 / 116 (pre-Providence) 120 / 220 / 275 / 316 (post-Providence) |
| Defense | 60 |
| DR | 15% |
| KB Resist | 100% |
Behavior[]
The Brimstone Elemental has 3 phases, starting out in phase 1, and randomly cycling through them after fully completing the attack. She cannot repeat the same phase twice in a row. Phase 3 can only be entered after she attacks 3 times.
Leaving the Brimstone Crag or The Underworld layer will cause the Brimstone Elemental to enrage, increasing her movement speed, projectile speed, and fire rate in all three phases. The enrage is even more effective if both conditions are met.
Attacks[]
Phase 1[]
- She slowly moves towards the player.
- After 5.13 / 4.63 seconds, she will teleport to somewhere randomly near the player.
- The location she teleports to is telegraph by a zone of red dust 2.13 seconds before occurring.
- She performs the teleport twice before changing to another phase.
- In this stage, she attempts to swallow the player. If a player is swallowed, they are unable to move and take damage over time.
- If a player dies while swallowed, they cannot respawn until the boss is defeated or despawns.
Phase 2[]
- She accelerates towards the player and attempts to stay slightly above.
- She fires Brimstone Hellfireballs with high acceleration towards the player every 0.83 / 0.67-0.83 / 0.58-0.75 / 0.5-0.67 seconds.
- After 4 seconds or upon collision with solid tiles, Brimstone Hellfireballs leave behind a damaging stationary explosion that lasts 3 seconds.
- For every two fireballs fired, she also fires a spread of four slower Brimstone Darts.
- She changes to another phase after firing 10 Brimstone Hellfireballs.
Phase 3[]
- She decelerates to a stop and closes her petals, increasing her defense to 99,999 and completely reduces the effectiveness of most homing attacks.
- Every 2 / 1-2 seconds, she fires an evenly-spaced ring of 12 / 16 Brimstone Darts along with a fast, arc-shaped barrage of 6 Brimstone Hellblasts.
- She changes to another phase after 5 / 4 seconds.
In Expert Mode[]
- Moves faster in her first phase, even faster as her health lowers.
- In phase 2 and 3, she fires projectiles at a faster rate as her health lowers.
- Brimstone Hellfireballs travel at a faster speed as her health lowers.
In Revengeance Mode[]
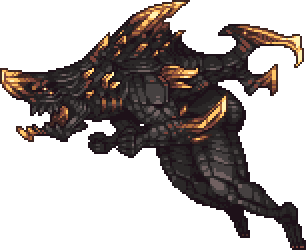
- After every teleport, she summons a Brimling to aid her during the fight.
- She will stop spawning Brimlings once there are two present.
- Increased base movement speed in phase 1, firing rate in phase 2, and projectile speed of Brimstone Hellfireballs.
- When below 50% health, she will only teleport once during phase 1.
- The Brimstone Elemental gains a new phase below 50% health which can appear in her randomized pool:
- During the phase, her defense is tripled.
- Her movement behaves identically to phase 1, but decelerates once a Brimstone Ray is fired.
- She attempts to aim ahead of the player with a line telegraph for 1.67 seconds. After, the line locks onto the position it last tracked and stays there for 0.33 seconds. These times are reduced to 1.25 seconds and 0.25 seconds respectively for her second shot.
- Then, a Brimstone Ray appear at the line's position, remaining still for 0.75 seconds, then bursts into an two rows of evenly-spaced Brimstone Darts, which travel perpendicularly out of the ray.
- After one second, she fires a second ray, or cycles into her next phase once both rays have been fired.
- Once she drops below 33% health, she will no longer be able to cycle to her first phase.
In Death Mode[]
- Decreased teleport delay and increased movement speed in phase 1, even higher as her health decreases.
- Increased movement speed, projectile speed, and firing rate in phase 2. Fires 8 Brimstone Darts per spread instead of 4.
- Increased projectile speed in phase 3, in addition to firing a second ring of Brimstone Darts. Transitions into the next phase after 4 seconds instead of 5.
- Fires only one Brimstone Ray with greater movement responsiveness. Darts from the Brimstone Ray are slower, but now home in on the player.
During the Boss Rush[]
- Does not have an enrage state.
- Teleport delay decreased from 5.13 / 4.63 to 3.63 seconds.
- Greatly increased movement speed in phases 1 and 2, and projectile speed in phases 2 and 3.
- Decreased firing delay in phase 3 from 2 / 1-2 seconds to 0.67 / 0.5-0.67 seconds.
Summons[]
| Image | Name | Condition |
|---|---|---|
 |
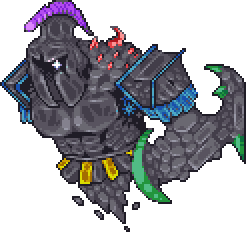
Brimling | Always in Revengeance Mode and in the Boss Rush |
Aftermath[]
- The Brimlish will be able to be caught in the Brimstone Crag.
- Charred Slimes will begin spawning in the Brimstone Crag.
Tips[]
- For more elaborate strategies on defeating the Brimstone Elemental, including weapon and arena recommendations, see Guide:Brimstone Elemental strategies.
- Try mining out the Brimstone Slag. This will offer more mobility to dodge her attacks.
- The Brimstone Crag has very rough terrain that's easy to get stuck on, so it's a good idea to smooth out the walls, roof and ground of the arena.
- Try to move around and focus on dodging instead of attacking when she closes her petals, as her projectiles can travel through blocks and her defense is greatly increased in this phase.
- The player should be aware of their proximity to her during this phase, as the further they are from her, the faster her projectiles go.
- If the player is too close however, her projectiles will have no time to spread out, so dodging them may be harder.
- If the player has the Early Hardmode Progression Rework enabled in the configuration options, she can only be fought once two mechanical bosses are defeated, as crafting her summon requires a Hardmode Forge.
- However, if the rework is turned off, she can be fought at the start of Hardmode.
Trivia[]
- The Brimstone Elemental's theme is Left Alone, which was composed by the artist DM DOKURO.
- If the Calamity Music add-on mod is disabled, Boss 4 will play instead.
- While some artwork depicts her as having two eyes, the Brimstone Elemental is actually a cyclops. This could be because her phase one sprite's pupil stretches the height of her eye, "splitting" it into two.
- The projectiles used in her Brimstone barrages are the same projectiles used in the Supreme Calamitas fight.
- The Brimstone Elemental can be fought at the start of Hardmode, as her summoning item only requires Souls of Night, Essences of Chaos, and Unholy Cores.
- However, if the Rework Early Hardmode Progression configuration option is enabled, she can be fought after 2 Mechanical Bosses have been defeated.
- The Brimstone Elemental was previously an alternative for Skeletron Prime because of her previous ability to drop Souls of Fright.
- If the Boss Checklist Mod is installed, her unique despawn message will be "Brimstone Elemental withdraws to the ruins of her shrine."


