Kevin Hammer (talk | contribs) (I FEEL LIKE A GOD!) Tag: Visual edit |
Wiki multicellular organism1 (talk | contribs) No edit summary Tags: Manual revert Source edit |
||
| (244 intermediate revisions by more than 100 users not shown) | |||
| Line 6: | Line 6: | ||
| ai = Jungle Dragon, Yharon AI |
| ai = Jungle Dragon, Yharon AI |
||
| damage = {{dv|330|528|660|759}} (Contact)<br/>{{dv|180|300|332|348}} (Flare Bomb)<br/>{{dv|200|340|376|396}} (Flarenado)<br/>{{dv|300|520|548|564}} (Infernado)<br/>{{dv|180|300|332|348}} (Phase 1 Flare Dust)<br/>{{dv|250|440|464|476}} (Phase 2 Flare Dust)<br/>{{dv|250|440|464|476}} (Splitting Fireball)<br/>{{dv|300|500|550|632}} (Death Flare Bomb Ring) |
| damage = {{dv|330|528|660|759}} (Contact)<br/>{{dv|180|300|332|348}} (Flare Bomb)<br/>{{dv|200|340|376|396}} (Flarenado)<br/>{{dv|300|520|548|564}} (Infernado)<br/>{{dv|180|300|332|348}} (Phase 1 Flare Dust)<br/>{{dv|250|440|464|476}} (Phase 2 Flare Dust)<br/>{{dv|250|440|464|476}} (Splitting Fireball)<br/>{{dv|300|500|550|632}} (Death Flare Bomb Ring) |
||
| − | | life = {{dv| |
+ | | life = {{dv|1,085,000|1,736,000|2,080,000}} |
| − | | defense = |
+ | | defense = 90 |
| − | | dr = |
+ | | dr = 22 |
| knockback = 100 |
| knockback = 100 |
||
| − | | debuff = |
+ | | debuff = Dragon Fire |
| − | | debufftip = Losing life |
+ | | debufftip = Losing life, reduced movement speed |
| duration = 3 seconds (All projectiles except Flarenado and Infernado)<br/>5 seconds (Flarenado)<br/>7 seconds (Infernado) |
| duration = 3 seconds (All projectiles except Flarenado and Infernado)<br/>5 seconds (Flarenado)<br/>7 seconds (Infernado) |
||
| debuffchance = 100% |
| debuffchance = 100% |
||
| + | | immune1 = Confused |
||
| − | | immuneall = yes <!-- Adding this will change the meaning of immune1, immune2 etc to vulnerability --> |
||
| − | | |
+ | | immune2 = Pearl Aura |
| − | | |
+ | | immune3 = On Fire! |
| + | | vulnerable1 = Magic |
||
| − | | immune3 = Demon Flames |
||
| − | | |
+ | | vulnerable2 = Dark |
| + | | resistant1 = Holy |
||
| − | | immune5 = Shellfish Claps |
||
| − | | |
+ | | resistant2 = Fire |
| ⚫ | |||
| − | | immune7 = Kami Flu |
||
| ⚫ | |||
| ⚫ | |||
|group|One of the following 8 weapons will always drop:|8 |
|group|One of the following 8 weapons will always drop:|8 |
||
| Yharon's Kindle Staff|1|{{dv|25%|33.33%}} |
| Yharon's Kindle Staff|1|{{dv|25%|33.33%}} |
||
| Line 29: | Line 29: | ||
| Phoenix Flame Barrage|1|{{dv|25%|33.33%}} |
| Phoenix Flame Barrage|1|{{dv|25%|33.33%}} |
||
| The Burning Sky|1|{{dv|25%|33.33%}} |
| The Burning Sky|1|{{dv|25%|33.33%}} |
||
| − | | |
+ | | Wrathwing|1|{{dv|25%|33.33%}} |
| Dragon Rage|1|{{dv|25%|33.33%}} |
| Dragon Rage|1|{{dv|25%|33.33%}} |
||
| Chicken Cannon|1|{{dv|25%|33.33%}} |
| Chicken Cannon|1|{{dv|25%|33.33%}} |
||
| + | | Dragon Flame Barrage|1|{{dv|25%|33.33%}} {{fantag|Calamity: Community Remix}} |
||
| ⚫ | |||
| ⚫ | |||
| ⚫ | |||
| ⚫ | |||
| Omega Healing Potion|5-15|100% |
| Omega Healing Potion|5-15|100% |
||
| ⚫ | |||
| + | | McNuggets|1|10% |
||
| Yharon Mask|1|14.29% |
| Yharon Mask|1|14.29% |
||
| ⚫ | |||
| ⚫ | |||
| + | | Yharim Bar|{{dv|0|5-7|6-8}}|100% {{fantag|Calamity: Community Remix}} |
||
| − | | Void Vortex|1|2.5% (Second phase) |
||
| + | | Chicken Nugget|5000|100% |
||
| ⚫ | |||
| ⚫ | |||
| ⚫ | |||
| − | | Yharim's Crystal|1|1% (Second phase) |
||
| ⚫ | |||
| custom| {{item|Treasure Bag (Jungle Dragon, Yharon)|Treasure Bag|note=(Jungle Dragon, Yharon)|wrap=y}} |
| custom| {{item|Treasure Bag (Jungle Dragon, Yharon)|Treasure Bag|note=(Jungle Dragon, Yharon)|wrap=y}} |
||
| ⚫ | |||
: • {{item|Fox Drive|note=(In [[Revengeance Mode]] only)|wrap=y}}|{{expert|100%}} |
: • {{item|Fox Drive|note=(In [[Revengeance Mode]] only)|wrap=y}}|{{expert|100%}} |
||
| image2 = Yharon map.png |
| image2 = Yharon map.png |
||
| image2caption = Map Icon |
| image2caption = Map Icon |
||
| + | | hurt = YharonHurt.wav |
||
| + | | killed = YharonDeath.wav |
||
| + | | sound2 = YharonRoar.wav |
||
| + | | sound2text = Roar |
||
| + | | sound3 = YharonRoarShort.wav |
||
| + | | sound3text = Short Roar |
||
| + | | sound4 = YharonFire.wav |
||
| + | | sound4text = Fire Breath |
||
| + | | sound5 = Item_20.wav |
||
| + | | sound5text = Fire Ring Cast |
||
| + | | sound6 = Item_14.wav |
||
| + | | sound6text = Fireball Explosion |
||
| hardmode = yes |
| hardmode = yes |
||
| postml = yes |
| postml = yes |
||
| boxwidth = 24em |
| boxwidth = 24em |
||
}}<section end=npc infobox /> |
}}<section end=npc infobox /> |
||
| − | [[File:Yharon_Trophy.png|25px]] <big> ''"The loyal guardian of the |
+ | [[File:Yharon_Trophy.png|25px]] <big> ''"The loyal guardian of the Jungle Tyrant"'' </big> [[File:Yharon_Trophy.png|25px]] |
| − | '''Jungle Dragon, Yharon''' is a major |
+ | '''Jungle Dragon, Yharon''' (Japanese: ファイヤー ''Fire'') is a major [[boss]] fought in the [[Jungle]]. He is intended to be fought after [[The Devourer of Gods]]. The player should be well equipped and prepared before summoning him as the boss is incredibly challenging. |
| − | Defeating Yharon |
+ | Defeating Yharon will provide the player with [[Yharon Soul Fragment]]s and letting players into the [[Dragon's Aerie]], granting the player access to one of the highest tiers of equipment. |
| − | |||
| − | Defeating Yharon the second time will provide the player with [[Yharon Soul Fragment]]s and generate [[Auric Ore]] in the world, granting the player access to one of the highest tiers of equipment, as well as the [[Eye of Extinction]], used to summon the [[superboss]] [[Supreme Calamitas]]. |
||
== Spawn == |
== Spawn == |
||
| − | Yharon does not spawn on his own, and requires the player to summon him |
+ | Yharon does not spawn on his own, and requires the player to summon him by using the [[Jungle Dragon Egg]] while in the [[Jungle]]. |
== Behavior == |
== Behavior == |
||
Yharon is incredibly fast and deadly, almost always charging the player at high speeds, dealing an extreme amount of contact damage. Between these charges, he will also perform a plethora of other deadly attacks, from firing a variety of projectiles, summoning many lingering Flarenadoes and Infernadoes, and spawning several minions to fight alongside him. |
Yharon is incredibly fast and deadly, almost always charging the player at high speeds, dealing an extreme amount of contact damage. Between these charges, he will also perform a plethora of other deadly attacks, from firing a variety of projectiles, summoning many lingering Flarenadoes and Infernadoes, and spawning several minions to fight alongside him. |
||
| − | At the start of the fight, Yharon will summon two massive stationary |
+ | At the start of the fight, Yharon will summon two massive stationary flame pillars {{dv|218.75||187.5||125}} blocks to the left and right of the player (measured from their centers) to serve as arena borders; Hence, the pillars will not be perfectly centered on the player's current position. Touching the flame pillars will deal massive damage, and successfully leaving the arena or flying above Yharon's designated enrage height (660 blocks high) will cause Yharon to become enraged, which massively increases his speed and quintuples his damage until the player returns. |
Yharon's charging speed is adjusted based on his distance from the player, meaning that he is difficult to outrun and he can quickly approach the player from anywhere in the world. |
Yharon's charging speed is adjusted based on his distance from the player, meaning that he is difficult to outrun and he can quickly approach the player from anywhere in the world. |
||
| + | |||
| + | If the player eats [[Delicious Meat]] during the battle, Yharon and the player will become immune to all damage for 5 seconds. Yharon will additionally stop attacking for 5 seconds and gradually heal 5% of its maximum health. This event occurs once per battle. |
||
=== Attacks === |
=== Attacks === |
||
| Line 72: | Line 86: | ||
===== Subphase 1 ===== |
===== Subphase 1 ===== |
||
*Charges twice consecutively. |
*Charges twice consecutively. |
||
| − | *Spawns |
+ | *Spawns a line of {{item|FlareBomb|nolink=yes|ext=gif|size=16px|Flare Bombs}} which start slow, but rapidly accelerate and home in on the player, however cannot turn very well. |
*Charges once, and does a fast charge, in which he goes twice as fast and far. |
*Charges once, and does a fast charge, in which he goes twice as fast and far. |
||
**Yharon will remain stationary for a second and roar before he performs his fast charges. During this telegraph he gains 40% damage reduction. |
**Yharon will remain stationary for a second and roar before he performs his fast charges. During this telegraph he gains 40% damage reduction. |
||
*Creates two {{item|Flare|nolink=yes|ext=gif|size=24px|Flare Tornado}} projectiles, which fall to the ground diagonally away from him. Upon contact with a tile or after not hitting a tile for a second, a large Flarenado is spawned. |
*Creates two {{item|Flare|nolink=yes|ext=gif|size=24px|Flare Tornado}} projectiles, which fall to the ground diagonally away from him. Upon contact with a tile or after not hitting a tile for a second, a large Flarenado is spawned. |
||
| − | *Upon reaching {{dv| |
+ | *Upon reaching {{dv|75%|85%|90%|}} health, Yharon transitions to his second subphase. |
===== Subphase 2 ===== |
===== Subphase 2 ===== |
||
*Charges twice, waits, and then once quickly. |
*Charges twice, waits, and then once quickly. |
||
| − | *Teleports above the player, and flies repeatedly in a circle, |
+ | *Teleports above the player, and flies repeatedly in a circle, shooting {{item|FlareDust|nolink=yes|ext=gif|size=16px|Flare Dusts}} out in a bullet-hell style circle pattern, with random openings of various sizes. |
**Yharon does not deal contact damage during his bullet-hell style attacks and gains 40% damage reduction. |
**Yharon does not deal contact damage during his bullet-hell style attacks and gains 40% damage reduction. |
||
*Waits for 3 seconds after the flare dust rings and then does 2 slow charges at the player. |
*Waits for 3 seconds after the flare dust rings and then does 2 slow charges at the player. |
||
*Flies in a loop, creating a ring of {{item|FlareDust2|nolink=yes|ext=gif|size=16px|Homing Flare Dusts}} that seek toward the player's initial position after a long delay. |
*Flies in a loop, creating a ring of {{item|FlareDust2|nolink=yes|ext=gif|size=16px|Homing Flare Dusts}} that seek toward the player's initial position after a long delay. |
||
*Creates a {{item|BigFlare|nolink=yes|ext=gif|size=30px|Big Flare Tornado}} which homes in on the player. Upon contact, a massive Infernado appears at the player's position. |
*Creates a {{item|BigFlare|nolink=yes|ext=gif|size=30px|Big Flare Tornado}} which homes in on the player. Upon contact, a massive Infernado appears at the player's position. |
||
| − | *Upon reaching {{dv| |
+ | *Upon reaching {{dv|62.5%|70%|75%|80%}} health, Yharon transitions to his third subphase. |
===== Subphase 3 ===== |
===== Subphase 3 ===== |
||
*Charges once normally and then twice quickly. |
*Charges once normally and then twice quickly. |
||
*Flies in a loop, creating a ring of Homing Flare Dusts that seek toward the player's initial position after a long delay. |
*Flies in a loop, creating a ring of Homing Flare Dusts that seek toward the player's initial position after a long delay. |
||
| − | *Spawns |
+ | *Spawns a line of flare bombs, which fly towards the player, attempting to deal damage by ramming them or shooting giga flares, in the flame's cases. |
*Does one normal, then one fast charge. |
*Does one normal, then one fast charge. |
||
*Creates a homing Flare Tornado, which spawns a Flarenado upon impact. |
*Creates a homing Flare Tornado, which spawns a Flarenado upon impact. |
||
| − | *Teleports near the player, and flies repeatedly in a circle, |
+ | *Teleports near the player, and flies repeatedly in a circle, shooting flare dusts out in a different bullet-hell style star-shaped pattern. |
| + | *Upon reaching 55% health, Yharon transitions to his second phase. |
||
| − | |||
| − | ==== Intermission ==== |
||
| − | Upon reducing Yharon's health to 10% or lower in phase 1, one of two things will happen depending on the player's current point progression. |
||
| − | |||
| − | The first time he is fought, and in any fight with him thereafter before gaining the dark sun's power, Yharon will fly away and end the fight there. All of his loot drops from the sky, except for the following: |
||
| − | *[[Drew's Wings]] |
||
| − | *His [[lore item]] |
||
| − | *His [[trophy]] |
||
| − | *[[Void Vortex]] |
||
| ⚫ | |||
| − | *[[Yharon Soul Fragment]]s |
||
| − | |||
| − | A [[status message]] appears in the chat directing the player to the newly-buffed Solar Eclipse. |
||
| − | |||
| − | Once the player returns to fight him again, the battle continues properly: Yharon now becomes invulnerable and regenerates 90% of his health, transitioning into his second phase. Yharon's damage reduction will increase from 24% to 26%. |
||
==== Phase 2 ==== |
==== Phase 2 ==== |
||
| Line 114: | Line 114: | ||
*Infernados in this phase are smaller and last for a longer amount of time. |
*Infernados in this phase are smaller and last for a longer amount of time. |
||
===== Subphase 4 ===== |
===== Subphase 4 ===== |
||
| − | *Summons |
+ | *Summons a {{item|BigFlare|nolink=yes|ext=gif|size=30px|Big Flare Tornado}} that homes in on the player. |
*Charges twice normally again before flying horizontally while releasing a wall of Homing Flare Dusts that seek toward the player's initial position after a long delay. |
*Charges twice normally again before flying horizontally while releasing a wall of Homing Flare Dusts that seek toward the player's initial position after a long delay. |
||
*Charges twice quickly before flying horizontally while firing several gravity-affected {{item|YharonFireball|nolink=yes|ext=gif|size=10px|Yharon Fireballs}} that, after falling for long enough or upon contact with tiles, quickly launch three Yharon Fireballs into the air that rain back down. These resulting Yharon Fireballs do not split. |
*Charges twice quickly before flying horizontally while firing several gravity-affected {{item|YharonFireball|nolink=yes|ext=gif|size=10px|Yharon Fireballs}} that, after falling for long enough or upon contact with tiles, quickly launch three Yharon Fireballs into the air that rain back down. These resulting Yharon Fireballs do not split. |
||
| − | *Charges twice normally once more and then flies in a loop, doing the flare dust bullet hell |
+ | *Charges twice normally once more and then flies in a loop, doing the flare dust bullet hell. |
| − | *Upon reaching {{dv| |
+ | *Upon reaching {{dv|27.5%|38.5%|44%|}} health, Yharon transitions to his fifth subphase. |
===== Subphase 5 ===== |
===== Subphase 5 ===== |
||
*Uses several fast charges in place of the short charges. |
*Uses several fast charges in place of the short charges. |
||
*The flare dust bullet hells and the wall of homing flare dust are switched in his attack pattern. |
*The flare dust bullet hells and the wall of homing flare dust are switched in his attack pattern. |
||
| − | *Upon reaching {{dv| |
+ | *Upon reaching {{dv|13.8%|22%|27.5%|35.8%}} health, Yharon transitions to his sixth subphase. |
===== Subphase 6 ===== |
===== Subphase 6 ===== |
||
| Line 136: | Line 136: | ||
*Yharon switches between his attacks at a faster rate. |
*Yharon switches between his attacks at a faster rate. |
||
*Yharon transitions into subphase 2 at 70% health, and subphase 3 at 40% health. |
*Yharon transitions into subphase 2 at 70% health, and subphase 3 at 40% health. |
||
| − | *Yharon transitions into subphase 5 at 70% health, subphase 6 at 40% health |
+ | *Yharon transitions into subphase 5 at 70% health, and subphase 6 at 40% health. |
*Yharon's charges are faster and done in much faster succession. |
*Yharon's charges are faster and done in much faster succession. |
||
=== In [[Revengeance Mode]] === |
=== In [[Revengeance Mode]] === |
||
| − | *Yharon gains a new subphase when below {{dv||| |
+ | *Yharon gains a new subphase when below {{dv|||11%|16.5%}} health: |
| − | **Teleports to one side of the player |
+ | **Teleports to one side of the player, then does 2 fast charges, with both having a shorter telegraph. |
| ⚫ | |||
| − | **Does 2 fast charges, with both having a shorter telegraph. |
||
| ⚫ | |||
**All attacks deal 10% more damage. |
**All attacks deal 10% more damage. |
||
| − | *Yharon's enrage height is reduced to 555 blocks from the spawning position and the |
+ | *Yharon's enrage height is reduced to 555 blocks from the spawning position and the border pillars spawn 187.5 blocks away from the starting position. |
*Yharon transitions into subphase 2 at 80% health, and subphase 3 at 50% health. |
*Yharon transitions into subphase 2 at 80% health, and subphase 3 at 50% health. |
||
*Yharon transitions into subphase 5 at 80% health and subphase 6 at 50% health. |
*Yharon transitions into subphase 5 at 80% health and subphase 6 at 50% health. |
||
| Line 153: | Line 152: | ||
*Yharon has decreased delays between attacks. |
*Yharon has decreased delays between attacks. |
||
*Most of Yharon's slow charges are replaced with fast charges. |
*Most of Yharon's slow charges are replaced with fast charges. |
||
| − | *Yharon spawns in subphase 2, and in subphase 5 after |
+ | *Yharon spawns in subphase 2, and in subphase 5 after Phase 2 begins. |
*Yharon transitions into subphase 3 at 60% health. |
*Yharon transitions into subphase 3 at 60% health. |
||
*Yharon transitions into subphase 6 at 65% health and subphase 7 at 30% health. |
*Yharon transitions into subphase 6 at 65% health and subphase 7 at 30% health. |
||
| Line 159: | Line 158: | ||
*Summons more Infernadoes in place of Flarenadoes. |
*Summons more Infernadoes in place of Flarenadoes. |
||
| + | === In [[Malice Mode]] === |
||
| ⚫ | |||
| + | *The border pillars spawn 125 blocks away from the starting position. |
||
| − | {| class="terraria" |
||
| + | *Attacks and charges become much faster. |
||
| − | ! Image !! Name !! Condition |
||
| + | *Density and speed of bullet-hell attacks increases as Yharon loses health. |
||
| − | |- |
||
| − | | align = center |{{item|Detonating Flame|mode=table}} || rowspan=1 | Always |
||
| − | | |
||
| − | |} |
||
== Aftermath == |
== Aftermath == |
||
| − | Once Yharon |
+ | Once Yharon is defeated, the following things happen: |
| − | *The [[Solar Eclipse]] will be greatly buffed and enemies begin dropping [[Darksun Fragment]]s. |
||
*The [[Bandit]] will begin selling [[Dragon Scales]]. |
*The [[Bandit]] will begin selling [[Dragon Scales]]. |
||
| + | *The Pathway to the [[Dragon's Aerie]] opens up, allowing players through |
||
| − | |||
| − | When Yharon's second phase is defeated, the following things happen: |
||
| − | *[[Auric Ore]] generates in the [[Cavern]] layer. |
||
*The [[Murasama]] can be used properly. |
*The [[Murasama]] can be used properly. |
||
| ⚫ | |||
| − | *[[Scryllar]]s begin dropping [[Gael's Greatsword]]. |
||
| + | *[[Sky Crate]]s begin dropping [[Dragonfruit]] if a [[Wyvern]] is alive while opened. |
||
| − | *The Sand, Cloud, and Brimstone Elementals from the [[Heart of the Elements]] now deal contact damage 20 times per second. |
||
| − | *The tornadoes from the Sand Elemental now deal damage 20 times per second. |
||
| ⚫ | |||
== Notes == |
== Notes == |
||
| − | *Yharon's enrage works differently from other bosses, as it is pre-determined from where the player stands when using the Dragon Egg. That number is 660 blocks in height in Normal and Expert mode and 555 blocks high in Revengeance and Death Mode. |
+ | *Yharon's enrage works differently from other bosses, as it is pre-determined from where the player stands when using the Jungle Dragon Egg. That number is 660 blocks in height in Normal and Expert mode and 555 blocks high in Revengeance and Death Mode. |
*If Yharon is enraged and not on screen in his second phase, he will despawn in exactly 2.5 seconds. |
*If Yharon is enraged and not on screen in his second phase, he will despawn in exactly 2.5 seconds. |
||
| − | *Yharon's [[Damage Reduction|damage reduction]] works differently from other bosses. [[Cursed Inferno]] reduces his DR by exactly 5% (from 24% to 19% in his first phase, and from 26% to 21% after he revives). |
||
*Flarenadoes and Infernadoes will not deal damage for a short period after spawning, to prevent cheap hits on the player. |
*Flarenadoes and Infernadoes will not deal damage for a short period after spawning, to prevent cheap hits on the player. |
||
| − | *If Yharon's [[Health]] is somehow reduced in one hit from above 10% to 0 in Phase 2, he will drop no items at all, except for [[Omega Healing Potion]]s. |
||
| − | **If it's reduced from above 10% to below 10% in Phase 1, it will be set to 10%. |
||
*While Yharon is alive, the world is colored deeply with orange. This will only happen if the Lighting option in the Settings Menu is set to "Color" or "White". |
*While Yharon is alive, the world is colored deeply with orange. This will only happen if the Lighting option in the Settings Menu is set to "Color" or "White". |
||
| + | *Yharon, while still technically able to be fought pre-Devourer of gods, it is intended for it to be fought after. |
||
| − | *The arena infernadoes use the exact same killing mechanism as [[The Devourer of Gods]]' head in Death Mode. |
||
| + | *Consuming a [[Yharic Delight]] will cause Yharon to explode. |
||
| + | *Yharon was a human and is on the title screen. |
||
== Tips == |
== Tips == |
||
{{dablink|For more elaborate strategies on defeating Yharon, including [[weapon]] and [[tgc:Guide:Arena|arena]] recommendations, see [[Guide:Jungle Dragon, Yharon strategies|Guide:Jungle Dragon, Yharon strategies]].}} |
{{dablink|For more elaborate strategies on defeating Yharon, including [[weapon]] and [[tgc:Guide:Arena|arena]] recommendations, see [[Guide:Jungle Dragon, Yharon strategies|Guide:Jungle Dragon, Yharon strategies]].}} |
||
| − | *Always be cautious when moving horizontally, as the arena |
+ | *Always be cautious when moving horizontally, as the arena flame pillars will instantly kill the player without warning. |
| − | **It is advisable to put up solid blocks in front of the |
+ | **It is advisable to put up solid blocks in front of the pillars to prevent accidentally contacting them. Because the places of the pillars are measured from their bottom-left corners, the actual block to summon Yharon is not in the center of the arena. The arena should have a height of {{dv|660||555}} blocks and a width of {{dv|311||253}} blocks. The block to summon Yharon needs to be the {{dv|128th||100th}} block from the left wall. This will ensure the player never touches the pillars. |
*A good tactic to avoid Flarenadoes is to fly to the edge of the arena and let the Detonating Flames hit you, dealing no damage to you and forcing the Flarenado to spawn out of the way of the fight. |
*A good tactic to avoid Flarenadoes is to fly to the edge of the arena and let the Detonating Flames hit you, dealing no damage to you and forcing the Flarenado to spawn out of the way of the fight. |
||
| + | *Using a dash accessory that deals damage, such as the [[Elysian Aegis]] or [[Asgardian Aegis]], can be very vital against Yharon when he's charging as he will take damage and deal no contact damage when the player is dashing. |
||
| − | *The [[Galaxia]] is a good weapon for melee users due to its ability to home in on enemies. |
||
| − | **If you do use the Galaxia, it might be a good idea to trigger a [[Frost Moon]] or [[Pumpkin Moon]] in order to get the [[Buffs]] that they give you. You should also try it next to the [[Solar Pillar]], if you get a lucky spawn. |
||
| − | *The [[Galaxy Smasher]] is a very powerful option despite its short range. |
||
| − | *The [[Alluvion]] with [[Wooden Arrow]]s and [[Phangasm]] with [[Vanquisher Arrow]]s are both extremely effective due to their massive damage output, especially when paired with the [[Elemental Quiver]]. Be wary, however, as the high amounts of arrow projectiles may cause FPS drops on weaker computers. |
||
| − | *The [[SDFMG]] and [[Minigun]] are very effective when used with [[Chlorophyte Bullet]]s due to their homing effects, allowing you to hit the boss more consistently. Keep in mind that the [[Chlorophyte Bullet]]s are nerfed by 20% in the Calamity Mod. |
||
| − | *The [[Greatsword of Blah]] is a powerful sword that deals good damage against Yharon. |
||
| − | *The [[Voltaic Climax]] and [[Helium Flash]] can achieve very high damage outputs especially when paired with the proper mage equipment. |
||
| − | *[[Yharon's Kindle Staff]] does incredible damage against Yharon, provided the player has enough minion slots to summon multiple of them. |
||
| − | *The [[Infernal Spear]] and [[Eclipse's Fall]] are very effective [[rogue]] options after defeating Yharon's first phase. |
||
| − | *The [[Empyrean Knives]] and [[Scourge of the Cosmos]] are very efficient for Yharon's second phase for melee and rogue users. |
||
| − | *It is highly recommended to have an [[accessory]] equipped that allows dashing, such as the [[Asgardian Aegis]] or [[Statis' Void Sash]], in order to evade Yharon's quick movements. |
||
| − | **Asgardian Aegis is especially useful against Yharon's dashes, as the player can run into him while dashing with the shield, granting immunity frames throughout the dash and providing a good amount of [[Rage]] due to its true melee damage. |
||
*The [[Rod of Discord]] or [[Normality Relocator]] are great tools to use during the fight to avoid the flarenados and some of his attacks. |
*The [[Rod of Discord]] or [[Normality Relocator]] are great tools to use during the fight to avoid the flarenados and some of his attacks. |
||
| + | *Yharon's "snack break" mechanic will effectively pause the fight for 5 seconds, giving you time to heal or get away from him at the cost of having to deal 5% more of his health than usual. |
||
| + | *Yharic Delights can be used to instantly kill Yharon if the player wishes to obtain mass quantities of Yharon's drops. |
||
== Trivia == |
== Trivia == |
||
| − | *Yharon's first phase [[Music|theme]] |
+ | *Yharon's first phase [[Music|theme]] is [https://www.youtube.com/watch?v=Avp6YE7qINg '''Infernal Catharsis (Rebirth)'''], which was composed by the artist [https://www.youtube.com/user/SUPEREMERALD123 DM DOKURO]. |
| − | **The in-game version starts a little further than the video, possibly to make it less similar to the original one. |
||
| − | **If the Calamity Music add-on mod is disabled, '''Boss 1''' will play instead. |
||
| − | *Yharon's first phase theme, ''after'' unlocking the second phase, is [https://www.youtube.com/watch?v=1FnxtW73hWE '''Infernal Catharsis'''], an original version of the previous theme which was also composed by DM DOKURO. |
||
| ⚫ | |||
**If the Calamity Music add-on mod is disabled, '''Boss 3''' will play instead. |
**If the Calamity Music add-on mod is disabled, '''Boss 3''' will play instead. |
||
| − | ** |
+ | **This theme is a remake of [https://www.youtube.com/watch?v=1FnxtW73hWE '''Infernal Catharsis'''], which is now [[Music Boxes|Music Box]] exclusive, and was also composed by DM DOKURO. |
| ⚫ | |||
| + | ***Prior to the release of the original Infernal Catharsis, Yharon's theme was [https://www.youtube.com/watch?v=iVZsZF5yiUE Kyurem's theme] from the game ''[https://bulbapedia.bulbagarden.net/wiki/Pok%C3%A9mon_Mystery_Dungeon:_Gates_to_Infinity Pokémon Mystery Dungeon: Gates to Infinity]'' (and was later reused in ''[https://bulbapedia.bulbagarden.net/wiki/Pok%C3%A9mon_Super_Mystery_Dungeon Pokémon Super Mystery Dungeon]'', both themes being played when fighting Kyurem). |
||
*Yharon's second phase theme is [https://www.youtube.com/watch?v=5GcPA3C0QeI '''Roar of the Jungle Dragon'''], which was also composed by DM DOKURO. |
*Yharon's second phase theme is [https://www.youtube.com/watch?v=5GcPA3C0QeI '''Roar of the Jungle Dragon'''], which was also composed by DM DOKURO. |
||
**This song contains full lyrics sung by DM DOKURO himself. The song is a warning from Yharon to his master, Yharim, about the strength and unstoppability of the player character. The song's lyrics are considered non-canonical to the mod's official lore. |
**This song contains full lyrics sung by DM DOKURO himself. The song is a warning from Yharon to his master, Yharim, about the strength and unstoppability of the player character. The song's lyrics are considered non-canonical to the mod's official lore. |
||
| − | **If the Calamity Music add-on mod is disabled, the |
+ | **If the Calamity Music add-on mod is disabled, the Moon Lord's theme will play instead. |
| + | *The firewall borders in the fight are based on an attack used by Senator Armstrong from the game ''[[wikipedia:Metal_Gear_Rising:_Revengeance|Metal Gear Rising: Revengeance]]''. |
||
*Yharon's design took heavy inspiration from [https://megaman.fandom.com/wiki/Falzar Falzar] from the ''Mega Man Battle Network'' series. |
*Yharon's design took heavy inspiration from [https://megaman.fandom.com/wiki/Falzar Falzar] from the ''Mega Man Battle Network'' series. |
||
*Yharon was previously known as "Jungle Phoenix, Yharon". |
*Yharon was previously known as "Jungle Phoenix, Yharon". |
||
| − | *Yharon used to have a 4th subphase in phase 1, however this was removed in update [[1.4.5.001]] |
+ | *Yharon used to have a 4th subphase in phase 1, however this was removed in update [[1.4.5.001]]. |
| − | *Yharon can be fought before |
+ | *Yharon can be fought before any boss has been defeated, as the Jungle Dragon Egg's recipe requires no [[Hardmode]] materials. The [[Exotic Pheromones]] can be crafted using [[Crimtane Bar|Crimtane]]/[[Demonite Bar]]s and [[Feather]]s, allowing access to the required [[Effulgent Feather]]s. |
*[[The Dragonfolly]] is a failed clone of Yharon. |
*[[The Dragonfolly]] is a failed clone of Yharon. |
||
| + | *Before [[1.5.0.001]], Yharon had to be fought on two different occasions. on the first fight, he would fly away at 10% health and buff Solar Eclipses (which are now buffed post-[[Devourer of Gods]]). on the second fight, Yharon would reach 10% health and regenerate back to 90% health, in which the second phase began. |
||
| + | **Yharon would use '''Infernal Catharsis (Rebirth)''' as his theme during the first fight, and the original '''Infernal Catharsis''' would play during phase 1 of the second fight. He still used '''Roar of the Jungle Dragon''' as his second phase theme. |
||
| + | **Auric Ore would only generate after defeating the second phase. |
||
| + | *If the [https://forums.terraria.org/index.php?threads/boss-checklist-in-game-progression-checklist.50668/ Boss Checklist Mod] is installed, his unique despawn message will be "What a shame, at least the master will be pleased to hear of this." |
||
| + | *Alongside [[Devourer of Gods|the Devourer of Gods]], Yharon is one of two [[Bosses|boss]] whose theme completely switches when changing phases. |
||
| + | *The mod creators had a big controversy if Yharon should be blue or orange, this is still undecided. |
||
| + | |||
| ⚫ | |||
| + | |||
| + | * "So you're the one who opposes the master? Then, you shall burn like countless before you.” (When summoned) |
||
| + | * "You've lasted longer than most. Not surprising, considering your previous accomplishments” (When Jungle Dragon, Yharon reaches its second subphase) |
||
| + | * "Still, you persist? I might need to put in my all..." (When Jungle Dragon, Yharon reaches its third subphase) |
||
| + | * "Alright, enough toying with you! It's time I showed you my full power. Take a good look, for it will be your last!" (When Jungle Dragon, Yharon reaches its second phase) |
||
| + | * "You will not know victory, child. Not this time." (When Jungle Dragon, Yharon reaches its fourth subphase) |
||
| + | * "How? How do you still stand in this blistering heat?!" (When Jungle Dragon, Yharon reaches its fifth subphase) |
||
| + | * "ENOUGH! You are but a speck in comparison to the master! What hope do you think you'll have when you face him?" (When Jungle Dragon, Yharon reaches its sixth subphase) |
||
| + | * "GRRAah! So you have bested me... I suppose I should have expected that. Annihilation waits at the end of this road, but for who?... If you're watching, master. I didn't want this to be the end of our time together, but it seems that it no longer matters. Prepare yourself, for they are getting closer than ever... goodbye." (When Jungle Dragon, Yharon dies) |
||
| + | * "Are you trying to escape? Apologies, but I cannot let that happen." (When Jungle Dragon, Yharon enrages) |
||
| + | * "Is that the crustacean's product? It baffles me how such a being was capable of creating a business as large as that... Oh, but that's neither here nor there." (If the player consumes a Delicious Meat during the battle) |
||
| + | * "I'M GONNA YHAR" (If the player consumes a Yharic Delight during the battle) |
||
| − | == Lore == |
||
| − | {{lore}} |
||
== See also == |
== See also == |
||
*[[Dragon God, Yharon]], a removed future variant of this boss. |
*[[Dragon God, Yharon]], a removed future variant of this boss. |
||
| − | *[https://calamitymod.gamepedia.com/Jungle_Dragon,_Yharon Crackdragon, Yharon] |
||
{{Master Template Characters |
{{Master Template Characters |
||
Latest revision as of 21:59, 19 February 2024
| Type | Boss |
|---|---|
| Environment | Jungle |
| AI Type | Jungle Dragon, Yharon AI |
| Damage | 330 / 528 / 660 / 759 (Contact) 180 / 300 / 332 / 348 (Flare Bomb) 200 / 340 / 376 / 396 (Flarenado) 300 / 520 / 548 / 564 (Infernado) 180 / 300 / 332 / 348 (Phase 1 Flare Dust) 250 / 440 / 464 / 476 (Phase 2 Flare Dust) 250 / 440 / 464 / 476 (Splitting Fireball) 300 / 500 / 550 / 632 (Death Flare Bomb Ring) |
| Max Life | 1,085,000 / 1,736,000 / 2,080,000 |
| Defense | 90 |
| DR | 22% |
| KB Resist | 100% |
| Inflicts debuff | 100% chance |
| Debuff duration | 3 seconds (All projectiles except Flarenado and Infernado) 5 seconds (Flarenado) 7 seconds (Infernado) |
| Debuff tooltip | Losing life, reduced movement speed |
| Immune to | |
| Vulnerable to: | |
| Resistant to: |
| Coins | 1 |
|---|
- Item (Quantity)Rate
 Yharon Soul Fragment (15-22 / 22-28)100%
- One of the following 8 weapons will always drop:
- 25% / 33.33%
- 25% / 33.33%
- 25% / 33.33%
- 25% / 33.33%
- 25% / 33.33%
- 25% / 33.33%
- 25% / 33.33%
- 25% / 33.33%
- 25% / 33.33%
- 100%
- 100%
- 10%
- Omega Healing Potion (5-15)100%
- 10%
- 10%
- 14.29%
- 10%
- Yharim Bar (5-7 / 6-8)100%
- Chicken Nugget (5000)100%
- Jungle Dragon, Yharon (Lore)(Always on first kill)100%
- Treasure Bag(Jungle Dragon, Yharon)
- • Fox Drive(In Revengeance Mode only)
100% - •


![]() "The loyal guardian of the Jungle Tyrant"
"The loyal guardian of the Jungle Tyrant" ![]()
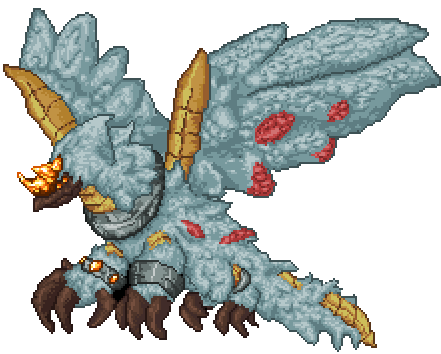
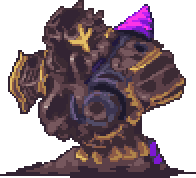
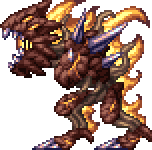
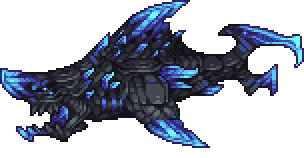
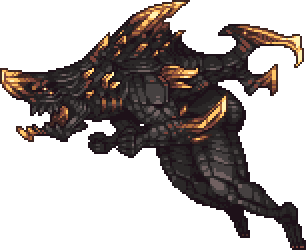
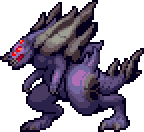
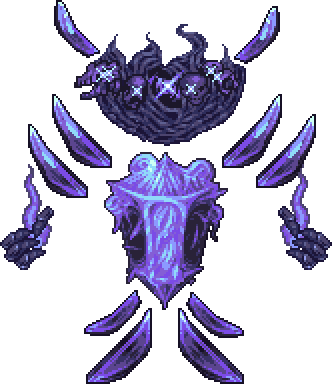
Jungle Dragon, Yharon (Japanese: ファイヤー Fire) is a major boss fought in the Jungle. He is intended to be fought after The Devourer of Gods. The player should be well equipped and prepared before summoning him as the boss is incredibly challenging.
Defeating Yharon will provide the player with Yharon Soul Fragments and letting players into the Dragon's Aerie, granting the player access to one of the highest tiers of equipment.
Spawn
Yharon does not spawn on his own, and requires the player to summon him by using the Jungle Dragon Egg while in the Jungle.
Behavior
Yharon is incredibly fast and deadly, almost always charging the player at high speeds, dealing an extreme amount of contact damage. Between these charges, he will also perform a plethora of other deadly attacks, from firing a variety of projectiles, summoning many lingering Flarenadoes and Infernadoes, and spawning several minions to fight alongside him.
At the start of the fight, Yharon will summon two massive stationary flame pillars 218.75 / 187.5 / 125 blocks to the left and right of the player (measured from their centers) to serve as arena borders; Hence, the pillars will not be perfectly centered on the player's current position. Touching the flame pillars will deal massive damage, and successfully leaving the arena or flying above Yharon's designated enrage height (660 blocks high) will cause Yharon to become enraged, which massively increases his speed and quintuples his damage until the player returns.
Yharon's charging speed is adjusted based on his distance from the player, meaning that he is difficult to outrun and he can quickly approach the player from anywhere in the world.
If the player eats Delicious Meat during the battle, Yharon and the player will become immune to all damage for 5 seconds. Yharon will additionally stop attacking for 5 seconds and gradually heal 5% of its maximum health. This event occurs once per battle.
Attacks
Phase 1
Subphase 1
- Charges twice consecutively.
- Spawns a line of Flare Bombs which start slow, but rapidly accelerate and home in on the player, however cannot turn very well.
- Charges once, and does a fast charge, in which he goes twice as fast and far.
- Yharon will remain stationary for a second and roar before he performs his fast charges. During this telegraph he gains 40% damage reduction.
- Creates two Flare Tornado projectiles, which fall to the ground diagonally away from him. Upon contact with a tile or after not hitting a tile for a second, a large Flarenado is spawned.
- Upon reaching 75% / 85% / 90% health, Yharon transitions to his second subphase.
Subphase 2
- Charges twice, waits, and then once quickly.
- Teleports above the player, and flies repeatedly in a circle, shooting Flare Dusts out in a bullet-hell style circle pattern, with random openings of various sizes.
- Yharon does not deal contact damage during his bullet-hell style attacks and gains 40% damage reduction.
- Waits for 3 seconds after the flare dust rings and then does 2 slow charges at the player.
- Flies in a loop, creating a ring of Homing Flare Dusts that seek toward the player's initial position after a long delay.
- Creates a Big Flare Tornado which homes in on the player. Upon contact, a massive Infernado appears at the player's position.
- Upon reaching 62.5% / 70% / 75% / 80% health, Yharon transitions to his third subphase.
Subphase 3
- Charges once normally and then twice quickly.
- Flies in a loop, creating a ring of Homing Flare Dusts that seek toward the player's initial position after a long delay.
- Spawns a line of flare bombs, which fly towards the player, attempting to deal damage by ramming them or shooting giga flares, in the flame's cases.
- Does one normal, then one fast charge.
- Creates a homing Flare Tornado, which spawns a Flarenado upon impact.
- Teleports near the player, and flies repeatedly in a circle, shooting flare dusts out in a different bullet-hell style star-shaped pattern.
- Upon reaching 55% health, Yharon transitions to his second phase.
Phase 2
"The air is getting warmer around you."
- Infernados in this phase are smaller and last for a longer amount of time.
Subphase 4
- Summons a Big Flare Tornado that homes in on the player.
- Charges twice normally again before flying horizontally while releasing a wall of Homing Flare Dusts that seek toward the player's initial position after a long delay.
- Charges twice quickly before flying horizontally while firing several gravity-affected Yharon Fireballs that, after falling for long enough or upon contact with tiles, quickly launch three Yharon Fireballs into the air that rain back down. These resulting Yharon Fireballs do not split.
- Charges twice normally once more and then flies in a loop, doing the flare dust bullet hell.
- Upon reaching 27.5% / 38.5% / 44% health, Yharon transitions to his fifth subphase.
Subphase 5
- Uses several fast charges in place of the short charges.
- The flare dust bullet hells and the wall of homing flare dust are switched in his attack pattern.
- Upon reaching 13.8% / 22% / 27.5% / 35.8% health, Yharon transitions to his sixth subphase.
Subphase 6
- The flare dust rings are now in the star-shape seen in subphase 3
- Similar to previous subphases with the new inclusion of teleports that occur right before a fast charge.
- All charges in the subphase are fast.
When Yharon is killed, a large ring of ![]() Flare Bombs is released at his death point. These travel outward before detonating after a few seconds to allow safe retrieval of Yharon's loot.
Flare Bombs is released at his death point. These travel outward before detonating after a few seconds to allow safe retrieval of Yharon's loot.
In Expert Mode
- Yharon gains an attack at the beginning of subphase 4, 5, and 6, in which he spawns 3 massive rings of flare dust that home in on the player after 3 seconds.
- Yharon switches between his attacks at a faster rate.
- Yharon transitions into subphase 2 at 70% health, and subphase 3 at 40% health.
- Yharon transitions into subphase 5 at 70% health, and subphase 6 at 40% health.
- Yharon's charges are faster and done in much faster succession.
In Revengeance Mode
- Yharon gains a new subphase when below 11% / 16.5% health:
- Teleports to one side of the player, then does 2 fast charges, with both having a shorter telegraph.
- Teleports near the player and does the flare dust bullet hell, and waits for 3 seconds before repeating.
- All attacks deal 10% more damage.
- Yharon's enrage height is reduced to 555 blocks from the spawning position and the border pillars spawn 187.5 blocks away from the starting position.
- Yharon transitions into subphase 2 at 80% health, and subphase 3 at 50% health.
- Yharon transitions into subphase 5 at 80% health and subphase 6 at 50% health.
- Charges and teleports closer to the player.
In Death Mode
- Yharon has decreased delays between attacks.
- Most of Yharon's slow charges are replaced with fast charges.
- Yharon spawns in subphase 2, and in subphase 5 after Phase 2 begins.
- Yharon transitions into subphase 3 at 60% health.
- Yharon transitions into subphase 6 at 65% health and subphase 7 at 30% health.
- Yharon launches more fireballs during his second phase.
- Summons more Infernadoes in place of Flarenadoes.
In Malice Mode
- The border pillars spawn 125 blocks away from the starting position.
- Attacks and charges become much faster.
- Density and speed of bullet-hell attacks increases as Yharon loses health.
Aftermath
Once Yharon is defeated, the following things happen:
- The Bandit will begin selling Dragon Scales.
- The Pathway to the Dragon's Aerie opens up, allowing players through
- The Murasama can be used properly.
- The Offensive and Defensive Guardians from the Profaned Soul Artifact now deal 225 damage.
- Sky Crates begin dropping Dragonfruit if a Wyvern is alive while opened.
Notes
- Yharon's enrage works differently from other bosses, as it is pre-determined from where the player stands when using the Jungle Dragon Egg. That number is 660 blocks in height in Normal and Expert mode and 555 blocks high in Revengeance and Death Mode.
- If Yharon is enraged and not on screen in his second phase, he will despawn in exactly 2.5 seconds.
- Flarenadoes and Infernadoes will not deal damage for a short period after spawning, to prevent cheap hits on the player.
- While Yharon is alive, the world is colored deeply with orange. This will only happen if the Lighting option in the Settings Menu is set to "Color" or "White".
- Yharon, while still technically able to be fought pre-Devourer of gods, it is intended for it to be fought after.
- Consuming a Yharic Delight will cause Yharon to explode.
- Yharon was a human and is on the title screen.
Tips
- For more elaborate strategies on defeating Yharon, including weapon and arena recommendations, see Guide:Jungle Dragon, Yharon strategies.
- Always be cautious when moving horizontally, as the arena flame pillars will instantly kill the player without warning.
- It is advisable to put up solid blocks in front of the pillars to prevent accidentally contacting them. Because the places of the pillars are measured from their bottom-left corners, the actual block to summon Yharon is not in the center of the arena. The arena should have a height of 660 / 555 blocks and a width of 311 / 253 blocks. The block to summon Yharon needs to be the 128th / 100th block from the left wall. This will ensure the player never touches the pillars.
- A good tactic to avoid Flarenadoes is to fly to the edge of the arena and let the Detonating Flames hit you, dealing no damage to you and forcing the Flarenado to spawn out of the way of the fight.
- Using a dash accessory that deals damage, such as the Elysian Aegis or Asgardian Aegis, can be very vital against Yharon when he's charging as he will take damage and deal no contact damage when the player is dashing.
- The Rod of Discord or Normality Relocator are great tools to use during the fight to avoid the flarenados and some of his attacks.
- Yharon's "snack break" mechanic will effectively pause the fight for 5 seconds, giving you time to heal or get away from him at the cost of having to deal 5% more of his health than usual.
- Yharic Delights can be used to instantly kill Yharon if the player wishes to obtain mass quantities of Yharon's drops.
Trivia
- Yharon's first phase theme is Infernal Catharsis (Rebirth), which was composed by the artist DM DOKURO.
- If the Calamity Music add-on mod is disabled, Boss 3 will play instead.
- This theme is a remake of Infernal Catharsis, which is now Music Box exclusive, and was also composed by DM DOKURO.
- This is the only theme that is not on DM DOKURO's official album. This is because when he made the "Rebirth" version, it was intended to replace the original one (and has).
- Prior to the release of the original Infernal Catharsis, Yharon's theme was Kyurem's theme from the game Pokémon Mystery Dungeon: Gates to Infinity (and was later reused in Pokémon Super Mystery Dungeon, both themes being played when fighting Kyurem).
- Yharon's second phase theme is Roar of the Jungle Dragon, which was also composed by DM DOKURO.
- This song contains full lyrics sung by DM DOKURO himself. The song is a warning from Yharon to his master, Yharim, about the strength and unstoppability of the player character. The song's lyrics are considered non-canonical to the mod's official lore.
- If the Calamity Music add-on mod is disabled, the Moon Lord's theme will play instead.
- The firewall borders in the fight are based on an attack used by Senator Armstrong from the game Metal Gear Rising: Revengeance.
- Yharon's design took heavy inspiration from Falzar from the Mega Man Battle Network series.
- Yharon was previously known as "Jungle Phoenix, Yharon".
- Yharon used to have a 4th subphase in phase 1, however this was removed in update 1.4.5.001.
- Yharon can be fought before any boss has been defeated, as the Jungle Dragon Egg's recipe requires no Hardmode materials. The Exotic Pheromones can be crafted using Crimtane/Demonite Bars and Feathers, allowing access to the required Effulgent Feathers.
- The Dragonfolly is a failed clone of Yharon.
- Before 1.5.0.001, Yharon had to be fought on two different occasions. on the first fight, he would fly away at 10% health and buff Solar Eclipses (which are now buffed post-Devourer of Gods). on the second fight, Yharon would reach 10% health and regenerate back to 90% health, in which the second phase began.
- Yharon would use Infernal Catharsis (Rebirth) as his theme during the first fight, and the original Infernal Catharsis would play during phase 1 of the second fight. He still used Roar of the Jungle Dragon as his second phase theme.
- Auric Ore would only generate after defeating the second phase.
- If the Boss Checklist Mod is installed, his unique despawn message will be "What a shame, at least the master will be pleased to hear of this."
- Alongside the Devourer of Gods, Yharon is one of two boss whose theme completely switches when changing phases.
- The mod creators had a big controversy if Yharon should be blue or orange, this is still undecided.
Quotes
- "So you're the one who opposes the master? Then, you shall burn like countless before you.” (When summoned)
- "You've lasted longer than most. Not surprising, considering your previous accomplishments” (When Jungle Dragon, Yharon reaches its second subphase)
- "Still, you persist? I might need to put in my all..." (When Jungle Dragon, Yharon reaches its third subphase)
- "Alright, enough toying with you! It's time I showed you my full power. Take a good look, for it will be your last!" (When Jungle Dragon, Yharon reaches its second phase)
- "You will not know victory, child. Not this time." (When Jungle Dragon, Yharon reaches its fourth subphase)
- "How? How do you still stand in this blistering heat?!" (When Jungle Dragon, Yharon reaches its fifth subphase)
- "ENOUGH! You are but a speck in comparison to the master! What hope do you think you'll have when you face him?" (When Jungle Dragon, Yharon reaches its sixth subphase)
- "GRRAah! So you have bested me... I suppose I should have expected that. Annihilation waits at the end of this road, but for who?... If you're watching, master. I didn't want this to be the end of our time together, but it seems that it no longer matters. Prepare yourself, for they are getting closer than ever... goodbye." (When Jungle Dragon, Yharon dies)
- "Are you trying to escape? Apologies, but I cannot let that happen." (When Jungle Dragon, Yharon enrages)
- "Is that the crustacean's product? It baffles me how such a being was capable of creating a business as large as that... Oh, but that's neither here nor there." (If the player consumes a Delicious Meat during the battle)
- "I'M GONNA YHAR" (If the player consumes a Yharic Delight during the battle)
See also
- Dragon God, Yharon, a removed future variant of this boss.


